the art of bicycle folding/packing for transport; modifications for rinko etc.

For discussions about bikes and equipment.
Jamesh
Posts: 2963
Joined: 2 Jan 2017, 5:56pm

Re: the art of bicycle folding/packing for transport; modifications for rinko etc.

Post by Jamesh »

Sweep wrote:
slowster wrote:Compass/Rene Herse Cycles used to sell a threaded headset tool for rinko bikes, but it's discontinued. However, Ison Distribution still have a small number of the old Cool Tool Headset Adapter Tools, which might be an option for a rinko bike with a threaded headset. The Cool Tool itself is no longer made/available, but the Headset Adapter Tool can be used with a small adjustable spanner provided it has narrow jaws (like those on the old Cool Tool's adjustable spanner); alternatively it could be used with a 150mm Knipex Pliers Wrench.


Interesting. I have an old cooltool, or the bits of it.
Can I ask how that adaptor works?
Fits onto the cool tool spanner?
Have you used one?
Is there enough leverage?


Off topic I have a cool tool but am missing the larger Allen key which slides over the smaller one. Any one have one?!

Cheers James
Brucey
Posts: 44705
Joined: 4 Jan 2012, 6:25pm

Re: the art of bicycle folding/packing for transport; modifications for rinko etc.

Post by Brucey »

mjr wrote:https://wiki.aalto.fi/download/attachments/110562254/rinko.pdf?version=1&modificationDate=1486045861527&api=v2 is one description of a pretty full rinko type A packing.


nice!

It wasn't clear that's what you meant and, anyway, isn't that getting it backwards, or did Rinko exist before train luggage restrictions?


I'd describe rinko as one solution to a problem, not a/the problem in it's own right.

cheers
-------------------------------------------------------------------------------
~~~~~~~~~~~~~~~~~~~~~~Brucey~~~~~~~~~~~~~~~~~~~~~~~~
User avatar
Sweep
Posts: 8449
Joined: 20 Oct 2011, 4:57pm
Location: London

Re: the art of bicycle folding/packing for transport; modifications for rinko etc.

Post by Sweep »

Brucey wrote:IIRC there is ridge on the adapter which the cool tool (or any adjustable spanner) snugs onto. You can see this upstand more clearly in this BB lockring tool

Image

Is there enough torque? Not really, not enough to loosen really tight parts. But there is probably enough to snug loose parts down, well enough to complete the ride you are on, maybe enough for a rinko style headset.

cheers


thanks brucey - may think about getting one - for threaded headsets on tour are one of those things which "back of mind" concerns me - trouble is I suppose that no matter how clever/mini the headset tool is you are also going to need a pretty damn big spanner/adjustable for the locknut.
Sweep
User avatar
mjr
Posts: 20337
Joined: 20 Jun 2011, 7:06pm
Location: Norfolk or Somerset, mostly
Contact:

Re: the art of bicycle folding/packing for transport; modifications for rinko etc.

Post by mjr »

Brucey wrote:If you simply remove the wheels and strap them to the rest of the bike you have a bundle that may be allowed on trains with less hassle than a complete bike

Image

I tried the above this morning. I don't think the pictured bike is packed realistically because there is too much slack in the top strap so I think the wheels will move and rub the frame which they've not covered at all.

Other things I have learned from the test:
- cover the derailleur and chainring to avoid oiling yourself or your main bag/cover inner too easily;
- cover the saddle to avoid scuffing it up until you get the packed bike into its cover;
- if your brake cables exit out the top (vintage-style) then either the hoods need to be lower than the tops (mine are) or I think you need to rotate the bars top-forwards to make it so;
- if leaving pedals in place as pictured, strap the non-drive-side crank to the chainstay, the opposite to what's shown - it'll make the package slightly bigger but the drive-side pedal will protect things from the chainring a bit;
- leave a route to pick up the bundle by the downtube in front of the bottom bracket;
- the toestrap which lashes the wheels behind the BB needs to be a long one - longer than I ever used;
- if you deflate a tyre to remove it, reinflate it before lashing the wheels;
- lying the pack down as in the PDF makes it easier to lash the wheels because then you're not also fighting gravity.

I've yet to figure out where to put rear mudguard and rack in the bundle. Around the wheel seems good but it might widen the bundle further.
MJR, mostly pedalling 3-speed roadsters. KL+West Norfolk BUG incl social easy rides http://www.klwnbug.co.uk
All the above is CC-By-SA and no other implied copyright license to Cycle magazine.
simonhill
Posts: 5260
Joined: 13 Jan 2007, 11:28am
Location: Essex

Re: the art of bicycle folding/packing for transport; modifications for rinko etc.

Post by simonhill »

Rather than have thread drift, I have started a new post on the Does anyone know forum.

viewtopic.php?f=1&t=129542

I have answered thirdcrank's question (above) and also given some info on Rinko from the Japanese perspective and from mine as a cycle tourist in Japan.
thirdcrank
Posts: 36781
Joined: 9 Jan 2007, 2:44pm

Re: the art of bicycle folding/packing for transport; modifications for rinko etc.

Post by thirdcrank »

There's already quite a wide range of bikes for these purposes from those prioritising the quick fold to some which just facilitate packing.

There are some good inventions illustrated above - I thought the MKS Ezy snap-in pedal system might be good on any bike for ease of swapping pedals.

Some of this seems to get the worst of both worlds: the third pic in Brucey's OP (pinkish bike) still ends up with the rear mech hung out to dry and a leather saddle risking being used to stand it all on. Even with all the wizardry, I could imagine spending nearly as long unpacking and packing the bike as riding it.
Brucey
Posts: 44705
Joined: 4 Jan 2012, 6:25pm

Re: the art of bicycle folding/packing for transport; modifications for rinko etc.

Post by Brucey »

I think any packing scheme works faster if you have had a bit of practice.

FWIW when I have packed a bike for transport, fearing that it will be damaged otherwise, I have usually removed the RD and lashed it to a chainstay.

An obvious place to stow the mudguards is around the wheels; if the wheels are staggered in the package, the mudguards can be set so as not to stick out. Similarly if the saddle is lowered fully, a wheel can sometimes be set to protect the saddle.

Re the rear rack, it depends how wide it is, but IIRC I've stowed it in such a way as it has straddled one wheel and the frame

cheers
-------------------------------------------------------------------------------
~~~~~~~~~~~~~~~~~~~~~~Brucey~~~~~~~~~~~~~~~~~~~~~~~~
User avatar
mjr
Posts: 20337
Joined: 20 Jun 2011, 7:06pm
Location: Norfolk or Somerset, mostly
Contact:

Re: the art of bicycle folding/packing for transport; modifications for rinko etc.

Post by mjr »

thirdcrank wrote:There's already quite a wide range of bikes for these purposes from those prioritising the quick fold to some which just facilitate packing.

Better to adapt a bike one likes than buy yet another.

Some of this seems to get the worst of both worlds: the third pic in Brucey's OP (pinkish bike) still ends up with the rear mech hung out to dry and a leather saddle risking being used to stand it all on. Even with all the wizardry, I could imagine spending nearly as long unpacking and packing the bike as riding it.

The exposed derailleur is a worry. In the past, I've taped a hard plastic flowerpot over it. A hub gear bike would avoid that, but most are as easy packing as a road bike with QRs and lightweight mudguards and rack.

As Brucey suggests, packing is not that slow after the first time if you note what works and work from those notes. I think I'm down to 15mins and I only break that bike down about once a year. With practice, I suspect a bit over 5mins would be possible.
MJR, mostly pedalling 3-speed roadsters. KL+West Norfolk BUG incl social easy rides http://www.klwnbug.co.uk
All the above is CC-By-SA and no other implied copyright license to Cycle magazine.
User avatar
mjr
Posts: 20337
Joined: 20 Jun 2011, 7:06pm
Location: Norfolk or Somerset, mostly
Contact:

Re: the art of bicycle folding/packing for transport; modifications for rinko etc.

Post by mjr »

Another two sets of Rinko instructions (second is a link at the bottom of the page): http://www.japancycling.org/v2/info/rinko/rinko.shtml
MJR, mostly pedalling 3-speed roadsters. KL+West Norfolk BUG incl social easy rides http://www.klwnbug.co.uk
All the above is CC-By-SA and no other implied copyright license to Cycle magazine.
Brucey
Posts: 44705
Joined: 4 Jan 2012, 6:25pm

Re: the art of bicycle folding/packing for transport; modifications for rinko etc.

Post by Brucey »

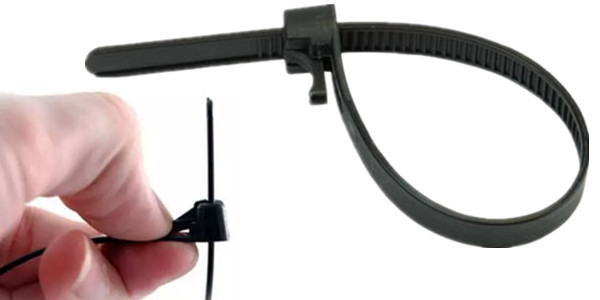
FWIW one of the things that is very handy for such lashing operations is a fistful of reusable zip ties; this is one type

Image

they are available in various different lengths.

You still need fabric straps (eg luggage straps) for the main lashings but the zip ties are useful too.

cheers
-------------------------------------------------------------------------------
~~~~~~~~~~~~~~~~~~~~~~Brucey~~~~~~~~~~~~~~~~~~~~~~~~
User avatar
mjr
Posts: 20337
Joined: 20 Jun 2011, 7:06pm
Location: Norfolk or Somerset, mostly
Contact:

Re: the art of bicycle folding/packing for transport; modifications for rinko etc.

Post by mjr »

Brucey wrote:FWIW one of the things that is very handy for such lashing operations is a fistful of reusable zip ties; this is one type

Image

they are available in various different lengths.

You still need fabric straps (eg luggage straps) for the main lashings but the zip ties are useful too.

cheers

String works too, is easier to find in shops and isn't plastic?
MJR, mostly pedalling 3-speed roadsters. KL+West Norfolk BUG incl social easy rides http://www.klwnbug.co.uk
All the above is CC-By-SA and no other implied copyright license to Cycle magazine.
User avatar
mjr
Posts: 20337
Joined: 20 Jun 2011, 7:06pm
Location: Norfolk or Somerset, mostly
Contact:

Re: the art of bicycle folding/packing for transport; modifications for rinko etc.

Post by mjr »

Brucey wrote:
mjr wrote:https://wiki.aalto.fi/download/attachments/110562254/rinko.pdf?version=1&modificationDate=1486045861527&api=v2 is one description of a pretty full rinko type A packing.


nice!

It's a better base than the other guides I've found. So, today's attempt, going through those steps:
1 & 2 - I left the pedals on. I don't need absolute smallest today.
3 & 4, 9 to 11 - I opened the brake adjuster toggles. My bike has calipers not cantilevers.
5 to 8 - I don't (yet) have a split mudguard. I loosened the stay clamps, then undid the brake bridge mount, then unclipped the stay bridge fixing, then finally undid the stay clamps and removed guard and rack. I took note of which order the stays and rack supports are in near the rear hub this time!
12 & 13 - I also left the bars on and the forks facing forwards. I don't need absolute smallest today.
14 to 17 - Then I dropped both wheels out. I wish my bike had a chain rest, but I put both runs in a spare bit of pipe-lagging instead to stop it gunking or scratching everything.
18 & 19 - I bagged derailleur and chainring and lagged the front triangle before laying the frame onto a wheel. I forgot and used the front wheel. I hope it doesn't matter too much!
20 to 22 - I forgot to unhook the derailleur cable from the stop and I don't think it's slotted anyway. I'll just take care not to bash the derailleur, as usual.
23 to 23 - I left the forks and front mudguard in place, only removing the front wheel. The wheels either side protect the front mudguard and I don't need absolute smallest today.
27 to 29 - I left the handlebars on. I don't need absolute smallest today.
30 - My three straps are almost at the midpoints of the ones shown. They're behind the BB, near the seat cluster and around the forks below the head tube. I hope it doesn't matter too much!
31 ;) - I then wrapped it in a sheet like http://www.japancycling.org/v2/info/rinko/rinko2.shtml and put a luggage strap around it to help the sheet stay put. I still lift the bundle by reaching in and picking up the down tube. I wouldn't want to run with it or swing it about too much, but it seems fairly comfortable to carry short distances.

Even for my large-ish bike (21" frame maybe? It's old and I forget...), the bundle ended up 90cm high x 115cm long x 35cm wide, which would be good enough for most trains including the notorious TGVs. If I unbolted the derailleur, it'd reduce it to about 100cm length, as well as making it more bash-resistant. I'm fairly sure it would need the seatpost slamming and forks/bars removing to get under Eurostar's 85cm carry-on rule.
MJR, mostly pedalling 3-speed roadsters. KL+West Norfolk BUG incl social easy rides http://www.klwnbug.co.uk
All the above is CC-By-SA and no other implied copyright license to Cycle magazine.
Brucey
Posts: 44705
Joined: 4 Jan 2012, 6:25pm

Re: the art of bicycle folding/packing for transport; modifications for rinko etc.

Post by Brucey »

mjr wrote:
Brucey wrote:FWIW one of the things that is very handy for such lashing operations is a fistful of reusable zip ties; s

String works too, is easier to find in shops and isn't plastic?


re-usable zip ties are, er, reusable. And very fast indeed. You can wipe them clean if they get oily, too.

cheers
-------------------------------------------------------------------------------
~~~~~~~~~~~~~~~~~~~~~~Brucey~~~~~~~~~~~~~~~~~~~~~~~~
thirdcrank
Posts: 36781
Joined: 9 Jan 2007, 2:44pm

Re: the art of bicycle folding/packing for transport; modifications for rinko etc.

Post by thirdcrank »

Toestraps to you mate. :wink:
Brucey
Posts: 44705
Joined: 4 Jan 2012, 6:25pm

Re: the art of bicycle folding/packing for transport; modifications for rinko etc.

Post by Brucey »

I used to have dozens of knackered toe straps; not any more. They seem to be becoming an endangered species.

cheers
-------------------------------------------------------------------------------
~~~~~~~~~~~~~~~~~~~~~~Brucey~~~~~~~~~~~~~~~~~~~~~~~~
Post Reply