My wife is using her old Pashley to get to work during lockdown, which I refurbed about 10 years ago.
She broke a spoke on the rear some years ago, but only today have I removed the rear wheel. Then found I did not have a spoke that could match (the wheel rims are cheap single walled ones), so trued the wheel with 35 spokes.
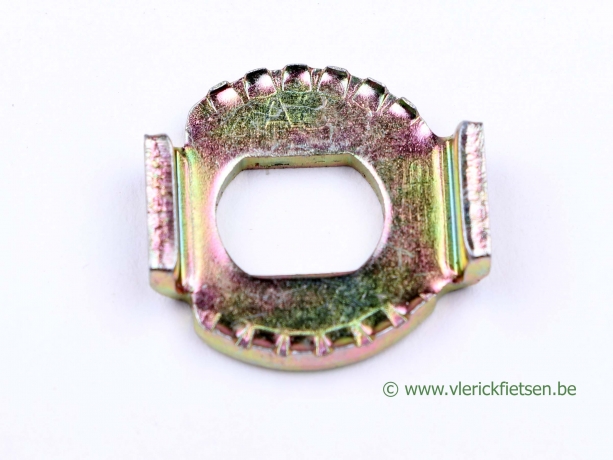
I can't remember how I made up this bike. But there is a Meccano set of stuff - metal mudguards, chain tighteners, chain-guard mount, strange shaped washer - that goes on these axles.
I obviously got it all working in the past, but is there anywhere a guide to how this all should go?
It has Schwalbe Marathon tyres and has never had a rear puncture, thank God.
How you fix this on the road is beyond me: presumably just keep patching the tyre with it in situ.
I have told my wife if she gets a puncture either to call me so I can pick her up in the car, or just ride back on the rims.
(I replaced the five speed hub (broken) when this discarded Pashley came to us with a three speed Sturmey Archer hub.)
My wife loves this frankly awful bike, for which I would never have paid money.
Pashley rear wheel
Pashley rear wheel
Daily: Carlton Courette 1982 mixte 42, 32, 22 x7
Van Nicholas Yukon titanium 50/34 10sp
Lazzaretti steel 1996 10sp 48/34
Trek 1.7 10sp 3x 2010;
Ciocc steel 1984 50/34x7
Marin Bolinas Ridge MTB c1995, 7x42, 34, 24
Scott Scale carbon MTB 27.5 inch
Van Nicholas Yukon titanium 50/34 10sp
Lazzaretti steel 1996 10sp 48/34
Trek 1.7 10sp 3x 2010;
Ciocc steel 1984 50/34x7
Marin Bolinas Ridge MTB c1995, 7x42, 34, 24
Scott Scale carbon MTB 27.5 inch
Re: Pashley rear wheel
a 'truly dreadful design' which will (with minimal maintenance) probably still be going when the rest of your bikes are mouldering in the landfill....?
The 'cheap' single wall rims have a deep well and this allows the tyres to be removed easily and those rims are more than strong enough because the wheels have no dish on them and (of course) don't need braking surfaces. If you replaced the rear hub you only have one person to blame for any spoke breakages...?
[BTW there was no need to remove the rear wheel to change a spoke, and no need to have got the wheel out before discovering that you didn't have the correct replacement spokes, either. In most Pashley roadsters the rear wheel spokes are 13G but built using slim-bodied nipples (the rim will usually be drilled for 14G nipples). This means that should a spoke break, it can be replaced with a 14G spoke and nipple, without removing the wheel.]
If you want to see how the rear axle is configured all you have to do is to read the manual eg.
https://www.sturmey-archer.com/files/catalog/files/307/PART%20LIST%20-%20X-RD3.pdf
The anti-rotation washers can go either side of the dropout, and if there is a chain tug, it goes on the other side of the dropout from the anti-rotation washer. A chain tug is usually only necessary on the RH side, and on ladies models it often isn't necessary at all. It is arguably much more important that the tabs on the anti-rotation washers fit in the dropouts snugly.
Plenty of people think that because the bike is a traditional design, it should somehow be 'simple'. 'Simple' is an almost 100% subjective term, based on any one person's experience. Probably because I have done it a few times I can usually remove the rear wheel from a Pashley roadster with 26x1/3/8" wheels and an SA IGH/hub brake in less than two minutes, and the tyre (yes even a marathon) will usually come off the rim without tyre levers.
There is one small nut and bolt on the brake reaction arm, the two track nuts/chain tugs, and one screw (on some models of full chaincase, not all). Nothing else requires any tools, it all comes apart using fingers. I think this is 'simple'; any 'simpler' and I'd be more worried about thieving toe rags pinching the back wheel....
For dealing with a puncture in the either wheel without removing the wheel you can
a) fit an endless tube
b) use aerosol sealant
c) patch the tube in situ
none of these are actually very difficult to do; arguably no worse than fixing a puncture in a bike where the wheels come out more easily. Ask yourself if your wife can fix a puncture in a bike where the wheels come out more easily; it may well be that it makes no real difference.
cheers
-------------------------------------------------------------------------------
~~~~~~~~~~~~~~~~~~~~~~Brucey~~~~~~~~~~~~~~~~~~~~~~~~
~~~~~~~~~~~~~~~~~~~~~~Brucey~~~~~~~~~~~~~~~~~~~~~~~~
Re: Pashley rear wheel
i removed the wheel so that I could true it properly without a Schwalbe Marathon tyre on it.
The spoke broke in the nipple when the wheel got caught in another bike when travelling. Not sure who was to blame.
Getting the Marathon tyre on is a marathon undertaking on these wheels.
This only has one anti rotation washer (it is possible one may have gone missing) and two chain tugs. My fingers are not strong enough to remove the 16mm hub nuts without a spanner.
It is easier to re-attach the wheel now I have dismantled the chain guard.
Getting some anti-puncture slime / aerosol is a good thought.
Removing this wheel is not to be repeated. And it can live with 35 spokes, too.
Daily: Carlton Courette 1982 mixte 42, 32, 22 x7
Van Nicholas Yukon titanium 50/34 10sp
Lazzaretti steel 1996 10sp 48/34
Trek 1.7 10sp 3x 2010;
Ciocc steel 1984 50/34x7
Marin Bolinas Ridge MTB c1995, 7x42, 34, 24
Scott Scale carbon MTB 27.5 inch
Van Nicholas Yukon titanium 50/34 10sp
Lazzaretti steel 1996 10sp 48/34
Trek 1.7 10sp 3x 2010;
Ciocc steel 1984 50/34x7
Marin Bolinas Ridge MTB c1995, 7x42, 34, 24
Scott Scale carbon MTB 27.5 inch
Re: Pashley rear wheel
what you call hub nuts are often known as track nuts. They are 15mm on SA hubs.
The last wheel I dealt with which used a rim of the sort that is used on those pashleys had a marathon plus tyre on it, and that came off without using tyre levers too. Just a question of getting the bead into the rim well; technique is everything here.
If the wheel was straight before the spoke broke, replacing the spoke should get the wheel back pretty close to where it was before. There is absolutely no need to remove the wheel or tyre to do a repair like this: It is almost always possible to replace a spoke (even with a broken nipple) in a single-walled rim without even removing the tyre, just by pushing the tyre to one side, and pushing the old spoke (or another spoke) upwards past the rim tape.
All that is needed at this stage is to fit a new nipple (which fits either the original spoke or the replacement spoke accordingly) to the rim; this is most easily accomplished by threading it onto the spoke you have pushed up past the rim tape.
So no need to remove the wheel or the tyre for a simple repair like that. 'Truing' the wheel with 35 spokes in it is just storing up more work and more trouble for later; you will need to adjust more spokes later when you do the job properly and in the meantime the unsupported rim may crack (which is also what happens to those rims in wheels without enough tension in them).
As I mentioned previously the most common arrangement is that the rear wheel of a pashley is build using 13G spokes in a rim drilled for 14G nipples. This means you should use a 'converter' nipple of the Spoke13/Rim14 type. Or you can just replace the entire spoke and nipple with 14G parts if you can't source the correct converter nipples (not every bike shop has them).
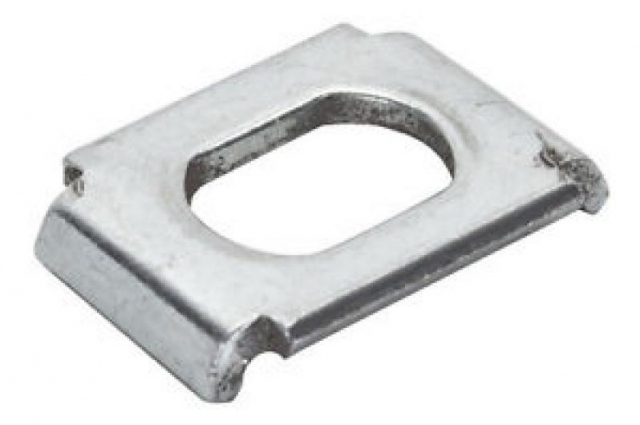
You can easily determine if the chaintugs are really necessary or not by leaving them slack and seeing if the wheel moves or not when pedalling hard in low gear. However you shouldn't bother even trying this with only one anti-rotation washer fitted; you should definitely have two. The most common one fitted to pashleys is HMW526
https://www.sjscycles.co.uk/hub-spares/sturmey-archer-lockwasher-1332ins-2mm-hmw526/
but there are several different anti-rotation washers which can be used on different hubs/bikes. None are expensive.
If you carry out poor quality repairs which not only include a lot of unnecessary effort but also fail to properly address the problem you are trying to solve then there is only one likely outcome; you will just get frustrated with it and the bike will fail to work properly and/or just break again.
cheers
The last wheel I dealt with which used a rim of the sort that is used on those pashleys had a marathon plus tyre on it, and that came off without using tyre levers too. Just a question of getting the bead into the rim well; technique is everything here.
If the wheel was straight before the spoke broke, replacing the spoke should get the wheel back pretty close to where it was before. There is absolutely no need to remove the wheel or tyre to do a repair like this: It is almost always possible to replace a spoke (even with a broken nipple) in a single-walled rim without even removing the tyre, just by pushing the tyre to one side, and pushing the old spoke (or another spoke) upwards past the rim tape.
All that is needed at this stage is to fit a new nipple (which fits either the original spoke or the replacement spoke accordingly) to the rim; this is most easily accomplished by threading it onto the spoke you have pushed up past the rim tape.
So no need to remove the wheel or the tyre for a simple repair like that. 'Truing' the wheel with 35 spokes in it is just storing up more work and more trouble for later; you will need to adjust more spokes later when you do the job properly and in the meantime the unsupported rim may crack (which is also what happens to those rims in wheels without enough tension in them).
As I mentioned previously the most common arrangement is that the rear wheel of a pashley is build using 13G spokes in a rim drilled for 14G nipples. This means you should use a 'converter' nipple of the Spoke13/Rim14 type. Or you can just replace the entire spoke and nipple with 14G parts if you can't source the correct converter nipples (not every bike shop has them).
You can easily determine if the chaintugs are really necessary or not by leaving them slack and seeing if the wheel moves or not when pedalling hard in low gear. However you shouldn't bother even trying this with only one anti-rotation washer fitted; you should definitely have two. The most common one fitted to pashleys is HMW526
https://www.sjscycles.co.uk/hub-spares/sturmey-archer-lockwasher-1332ins-2mm-hmw526/
but there are several different anti-rotation washers which can be used on different hubs/bikes. None are expensive.
If you carry out poor quality repairs which not only include a lot of unnecessary effort but also fail to properly address the problem you are trying to solve then there is only one likely outcome; you will just get frustrated with it and the bike will fail to work properly and/or just break again.
cheers
Last edited by Brucey on 31 Dec 2020, 11:48pm, edited 1 time in total.
-------------------------------------------------------------------------------
~~~~~~~~~~~~~~~~~~~~~~Brucey~~~~~~~~~~~~~~~~~~~~~~~~
~~~~~~~~~~~~~~~~~~~~~~Brucey~~~~~~~~~~~~~~~~~~~~~~~~

Re: Pashley rear wheel
For replacing the spoke, the tool you need is the Spocalc spreadsheet on the Sheldon Brown site, if you can measure the hub and rim, to get the right length.
Re: Pashley rear wheel
Leaving this well alone would have been very sensible, but now I have a major problem (all because I removed a back wheel).
Do the chain tugs fit within the stays, or without? I have put them within, as before. Only the metal mudguard is without.
The anti-rotation washer I am using to try to keep the chain guard mount in place, which is also within the stays to be close to the chain.
I am not sure what other use these washers serve. The axle is cut-away and only fits in the frame one way.
Daily: Carlton Courette 1982 mixte 42, 32, 22 x7
Van Nicholas Yukon titanium 50/34 10sp
Lazzaretti steel 1996 10sp 48/34
Trek 1.7 10sp 3x 2010;
Ciocc steel 1984 50/34x7
Marin Bolinas Ridge MTB c1995, 7x42, 34, 24
Scott Scale carbon MTB 27.5 inch
Van Nicholas Yukon titanium 50/34 10sp
Lazzaretti steel 1996 10sp 48/34
Trek 1.7 10sp 3x 2010;
Ciocc steel 1984 50/34x7
Marin Bolinas Ridge MTB c1995, 7x42, 34, 24
Scott Scale carbon MTB 27.5 inch
Re: Pashley rear wheel
Bice wrote:
Do the chain tugs fit within the stays, or without? I have put them within, as before. Only the metal mudguard is without.
The anti-rotation washer I am using to try to keep the chain guard mount in place, which is also within the stays to be close to the chain.
I am not sure what other use these washers serve. The axle is cut-away and only fits in the frame one way.
the axle alone (even if it seems to 'fit' in the dropout slots) will move and spin when you apply a lot of torque in low gear because there is a (large) reaction torque on the axle; that is a necessary feature of IGHs, and why you need the anti rotation washers.
Chaincases vary in the way they are mounted but if there is an axle bracket (which usually comes with the older 'clamshell' type plastic chaincases) it almost always makes the chainguard much easier to deal with if the bracket ( turned 180 degrees if necessary) is secured to the RH chainstay instead (slightly forwards of the axle) rather than on the hub axle(*). Because the tubing in the chainstay is commonly thick and relatively unstressed where the bracket would attach, you can use a self-tapping screw for this purpose; many framesets are fitted with a nutsert or braze-on near the dropout to allow a chainguard bracket to be properly mounted. A band-on fitting (eg a couple of hose clips) will work too of course.
(*) this isn't always possible but if the chainstays are the longest that can be used with that model of chaincase, there is usually enough room for the bracket to be placed forwards of any possible axle position.
So with the parts you have at present, on the RHS (LHS similar) you could assemble in the following order;
- chainguard bracket
- anti-rotation washer
- dropout
- chain tug (which can be turned so the offset works in the correct way)
- mudguard bracket
- flat washer
- track nut
putting the chain tug on the outside means it can be added after the wheel is refitted which is easier (not least because it doesn't stop you from pulling the wheel forwards so the chain will go on the sprocket easily). If the chainguard bracket is fitted somewhere other than the axle the whole assembly is usually much easier to deal with of course.
As mentioned previously chain tug(s) may only be required on the RHS or not at all, which again makes everything simpler.
Whilst I can get a wheel like that out in a couple of minutes, it does take a bit longer to get it back in again; with a 'full set' of chaincase bracket and chain tugs it can all be rather fiddly and frustrating.
cheers
-------------------------------------------------------------------------------
~~~~~~~~~~~~~~~~~~~~~~Brucey~~~~~~~~~~~~~~~~~~~~~~~~
~~~~~~~~~~~~~~~~~~~~~~Brucey~~~~~~~~~~~~~~~~~~~~~~~~
Re: Pashley rear wheel
The wheel is back in place and all working. I had to put the chain tighteners within the stays, which may have been splayed at some point. The chain tighteners I found essential.
The whole exercise took hours and was pointless, except I have a better idea of what I am doing. I did not even re-grease the bearings, although I recentred the hub a bit. (Talking of which, how on earth do you tighten the locknut on the offside bearing, which is encased in the drum brake? There is no way of holding the cone (which is in the drum brake) while tightening the locknut. I did it as far as I dared, and probably did the same first time round.
I might go down and see this fellow after lockdown and give the hub a proper service. https://britishhubgears.co.uk/index.php
The absent 36th spoke is not very important given the uses of this bike, and easily remedied once I get one that actually fits.
Daily: Carlton Courette 1982 mixte 42, 32, 22 x7
Van Nicholas Yukon titanium 50/34 10sp
Lazzaretti steel 1996 10sp 48/34
Trek 1.7 10sp 3x 2010;
Ciocc steel 1984 50/34x7
Marin Bolinas Ridge MTB c1995, 7x42, 34, 24
Scott Scale carbon MTB 27.5 inch
Van Nicholas Yukon titanium 50/34 10sp
Lazzaretti steel 1996 10sp 48/34
Trek 1.7 10sp 3x 2010;
Ciocc steel 1984 50/34x7
Marin Bolinas Ridge MTB c1995, 7x42, 34, 24
Scott Scale carbon MTB 27.5 inch
Re: Pashley rear wheel
Bice wrote:The wheel is back in place and all working. I had to put the chain tighteners within the stays, which may have been splayed at some point. The chain tighteners I found essential.
provided the axle is long enough you can add spacers behind the locknuts to make the hub better match the frame width, and then fit the chain tugs on the outside of the dropouts, where they are much easier to deal with.
[BTW it isn't usual for a new tyre or tube to be slipped into position in a bike shop by splaying the rear stays, eg using 'Dutch pliers' or similar, This is fairly obviously potentially very bad for the frame (which is why I don't do it myself), but in fairness I don't remember seeing a frame which has gone on to break because of this treatment.]
…. how on earth do you tighten the locknut on the offside bearing, which is encased in the drum brake? There is no way of holding the cone (which is in the drum brake) while tightening the locknut....
The correct spacer between the locknut and the brake plate is actually a 'cone adjuster' (eg HSA371, although IIRC there may be several part numbers for different brake hubs) which has flats within (which engage with the cone) and notches without, which allow it to be held/moved provided you use the correct tool (which is a kind of miniature c-spanner, which SA no longer deign to supply...

HSA371
To ease adjustment of the bearings and tightening of the locknut etc I advise that you obtain and fit part HMW150 on the left side between the locknut and the cone adjuster.

HMW150
once this is installed you can tighten the locknut without the cone moving substantially (although there will always be some backlash rather than none). It is normally perfectly acceptable to prod the cone adjuster into the required position using a screwdriver before tightening the locknut using a cone spanner. One of the (many) advantages of a SA rear hub brake is that the bearings can be adjusted in situ, which is of course impossible with shimano hubs when roller brakes are fitted.
If your hub has nothing between the locknut and cone on the RHS (as is most often the case with hubs made in the last 15 years), I strongly advise fitment of HMW147
HMW147
this completely eliminates the possibility that the RH cone will work loose, then precess into the hub and wreck it, which can and does happen when this part is absent.
cheers
-------------------------------------------------------------------------------
~~~~~~~~~~~~~~~~~~~~~~Brucey~~~~~~~~~~~~~~~~~~~~~~~~
~~~~~~~~~~~~~~~~~~~~~~Brucey~~~~~~~~~~~~~~~~~~~~~~~~
Re: Pashley rear wheel
There are compromises with this Pashley.
After fitting the hub there is about 2cms of space (in total) either side of the locknuts. So if I put the chain tighteners etc on the other side of the stay, I would have to bend back the frame to get it all to fit.
The bike, already old, was almost certainly stolen and then trashed: both wheels were pringles. The saddle, which I now use on my commuter, had shrunk and had the texture of a winter leaf. So it had done at least one winter outside. My daughter found it on the common and she and my wife shot off to pick it up. Then presented me with a task.
One of the front forks has bad corrosion, but it has withstood bridleways etc.
I have fixed it up as best I can and, to its credit, it does work pretty well. (I had to buy a three speed X-RD3 and do the wheels.) Re-cabled, new gears etc. I would not have done it myself, but the bike shop supposedly knowledgeable about Pashleys and Sturmey Archer were bluffers: they are in a fashionable part of town and think they are bit players in some movie.
Sorting it out properly would be a good idea. A new bike would be a better idea, but unfortunately this is dearly loved.
I noted the leftside cone adjuster / spacer and, yes, using a flat screwdriver did occur to me (too late, though).
I have some of the stuff of the five speed SA Sprint, which I am happy to donate. I will upload a pic.
Daily: Carlton Courette 1982 mixte 42, 32, 22 x7
Van Nicholas Yukon titanium 50/34 10sp
Lazzaretti steel 1996 10sp 48/34
Trek 1.7 10sp 3x 2010;
Ciocc steel 1984 50/34x7
Marin Bolinas Ridge MTB c1995, 7x42, 34, 24
Scott Scale carbon MTB 27.5 inch
Van Nicholas Yukon titanium 50/34 10sp
Lazzaretti steel 1996 10sp 48/34
Trek 1.7 10sp 3x 2010;
Ciocc steel 1984 50/34x7
Marin Bolinas Ridge MTB c1995, 7x42, 34, 24
Scott Scale carbon MTB 27.5 inch
Re: Pashley rear wheel
Bice wrote:There are compromises with this Pashley....
ain't it just the way with all bikes...?..
I noted the leftside cone adjuster / spacer and, yes, using a flat screwdriver did occur to me (too late, though)....
what the screwdriver won't do for you is to stop the cone adjuster from turning (if it wants to) as you tighten the locknut. Not unless part HMW150 (or similar) is fitted. However without it, whether the cone adjuster turns or not depends on whether the friction to the locknut is more than that to the brake plate or not, which is pot luck, pretty much.
You can get axles up to 177mm which fit X-RD3 (NIG) hubs (eg HSA808) and make these hubs fit wider OLN frames (certainly up to about 130mm). Such axles cost about £15. The discrepancy between your current hub and the frame may have arisen because the frame has been reset wider and/or because the original 5s hub was slightly wider. You can usually get away with resetting the back end of a frame like that several times before it is likely to break.
It sounds as if you inherited a lot of problems one way or another, but nothing that can't be fixed if you go about it in the right way. Probably you will be able to make the bike pretty sound without spending a fortune more on it. Getting the rear wheel in and out will always be something of a faff but it can at least be made moderately painless.
cheers
-------------------------------------------------------------------------------
~~~~~~~~~~~~~~~~~~~~~~Brucey~~~~~~~~~~~~~~~~~~~~~~~~
~~~~~~~~~~~~~~~~~~~~~~Brucey~~~~~~~~~~~~~~~~~~~~~~~~
Re: Pashley rear wheel
this is how frames get opened up at the back by mechanics in a hurry;
the tool used is either 'Dutch pliers' (which fit into the dropout) or (as above) what the Dutch call a 'vorkuitzetter' (fork spreader). This works a bit like a back-to-front spring compressor, with better padded jaws.
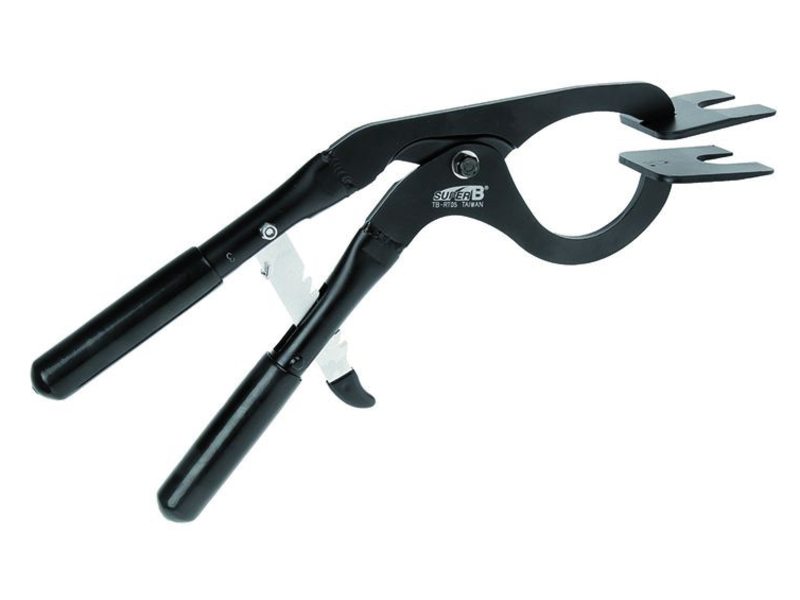
'fork spreader' pliers , aka 'Dutch pliers'
the opening near the jaws can accommodate the new tyre and/or tube; once the stays are opened, they can be slipped through the gap. The old tyre/tube is normally cut out.
This scheme works reasonably well on steel frames made of low tensile steel, which seems to be sufficiently ductile to take this treatment.
cheers
the tool used is either 'Dutch pliers' (which fit into the dropout) or (as above) what the Dutch call a 'vorkuitzetter' (fork spreader). This works a bit like a back-to-front spring compressor, with better padded jaws.
'fork spreader' pliers , aka 'Dutch pliers'
the opening near the jaws can accommodate the new tyre and/or tube; once the stays are opened, they can be slipped through the gap. The old tyre/tube is normally cut out.
This scheme works reasonably well on steel frames made of low tensile steel, which seems to be sufficiently ductile to take this treatment.
cheers
-------------------------------------------------------------------------------
~~~~~~~~~~~~~~~~~~~~~~Brucey~~~~~~~~~~~~~~~~~~~~~~~~
~~~~~~~~~~~~~~~~~~~~~~Brucey~~~~~~~~~~~~~~~~~~~~~~~~
Re: Pashley rear wheel
This is surely a 'too good to lose' thread, excellent detailed advice from Brucey as usual.
I don't know much, but I think I can still recognise hard won knowledge when I see it, thanks on behalf of
the majority (I imagine!) forum members for his and others technical know-how freely given during the past year.
I don't know much, but I think I can still recognise hard won knowledge when I see it, thanks on behalf of
the majority (I imagine!) forum members for his and others technical know-how freely given during the past year.
Nu-Fogey
Re: Pashley rear wheel
FWIW if you are using a standard (for Pashley) single wall aluminium rim for 26 x 1-3/8" tyres (590 size) it will usually have an ERD of 579 to 580mm. Built 3x36 with an SA X-RD3 hub this normally uses spoke lengths of between 270mm (DS) and 272mm (NDS).
As mentioned previously Pashley Roadster rear wheels are commonly built using 13G PG spokes, and spoke13G/rim14G converter nipples.
Arguably after the frameset, the rear wheel is one of the most important parts of any bike, and for a roadster with an IGH and hub brakes, this goes double; get those parts right and you have the bike more than half complete.
cheers
-------------------------------------------------------------------------------
~~~~~~~~~~~~~~~~~~~~~~Brucey~~~~~~~~~~~~~~~~~~~~~~~~
~~~~~~~~~~~~~~~~~~~~~~Brucey~~~~~~~~~~~~~~~~~~~~~~~~
Re: Pashley rear wheel
colin54 wrote:This is surely a 'too good to lose' thread, excellent detailed advice from Brucey as usual.
I don't know much, but I think I can still recognise hard won knowledge when I see it, thanks on behalf of
the majority (I imagine!) forum members for his and others technical know-how freely given during the past year.
Absolutely agree with this and share my thanks.
This advice needs archiving, or turning into a book.
This might be useful in a special Sturmey Archer or Pashley section.
(I don't find the search on this forum software to be that effective.)
Daily: Carlton Courette 1982 mixte 42, 32, 22 x7
Van Nicholas Yukon titanium 50/34 10sp
Lazzaretti steel 1996 10sp 48/34
Trek 1.7 10sp 3x 2010;
Ciocc steel 1984 50/34x7
Marin Bolinas Ridge MTB c1995, 7x42, 34, 24
Scott Scale carbon MTB 27.5 inch
Van Nicholas Yukon titanium 50/34 10sp
Lazzaretti steel 1996 10sp 48/34
Trek 1.7 10sp 3x 2010;
Ciocc steel 1984 50/34x7
Marin Bolinas Ridge MTB c1995, 7x42, 34, 24
Scott Scale carbon MTB 27.5 inch