SRAM DualDrive; a common failure mode?
Posted: 26 Nov 2014, 12:27am
I've recently been investigating the inner workings of a SRAM Dualdrive II hub.
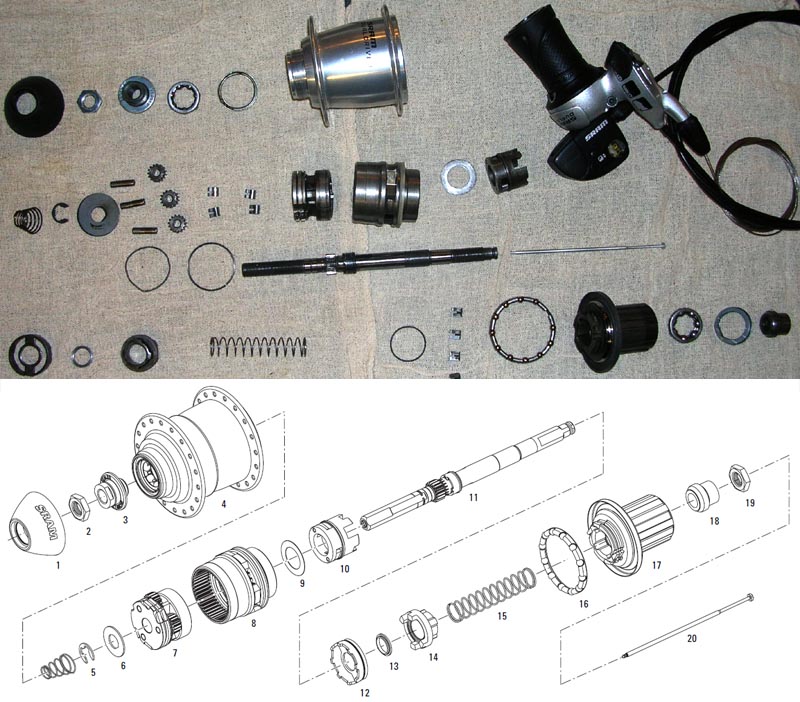
As ever Aaron of 'rideyourbike.com' in seattle has posted some useful photos and diagrams including this;
The Dualdrive hub has been around a while now and some folk have them that last for years and others seem to break them with monotonous regularity.
These are my impressions of the hub, how it might break and how to maintain it most easily.
Now there are many ways of making a three-speed hub and quite a few means of nailing on a cassette driver. SRAM must think they are doing something right because there are only detailed changes between the different models they have produced over the last few years. In the grand scheme of things some of the parts are rather small and weedy looking when compared with some other three-speed gears but they are clearly strong enough for most purposes. As with many IGHs I recommend that you continue to pedal forwards whilst shifting, but with little or no force on the pedals until the shift is complete.
If you want to lubricate the hub you can strip it down or you can lubricate it from the outside. If you select high gear on the IGH, and remove the LH axle plastic end plug (Phillips #2 point), you can add grease (not ideal if it is at all thick, it can jam pawls), semi fluid grease (a much better idea) and/or oil using a syringe or grease gun, via the hollow axle. Note that there is little in the way of an internal ridge to the hubshell, so if you use oil, most of it will come right out again; oil is good for flushing but not for long term lubrication.
-------------------------------------------------------
Control rods;
The OEM control rod is a bit flimsy (they can break off at the end) and as usual there is a crummy clickbox contraption on the RH side in most cases. If you want something different to this you can;
a) make a toggle chain pull rod (welding required) and use a radiused end nut on the RH end. You will need a shifter with a total cable pull of 10.3mm (or slightly over to get reliable gear 2 selection)
b) make a left side pushrod; (you will need to remove the LH plug). This can be a beefy 3/16" rod, because there is no spring on the LH side of the axle (unlike the other side). If you make the rod the right length (about 100mm) the rod elbow will bottom on the end of the axle before the rod is likely to break anything internal to the hub if/when the bike falls over or takes a knock.
c) make an SA-based toggle chain pull-rod. The key from an older SA AW hub can be ground to fit in the SRAM hub and then a long rod can be made up using SA parts and welding. Why bother? -well, the SA toggle thread is slightly bigger and stronger, and you are more likely to find an SA toggle chain on your travels I reckon, even if it needs modification to make it work OK. The rod needs to be longer than any standard SA rod and it needs to be a smaller diameter than most SA rods. It can be up to about 3mm diameter and still fit inside the axle spring on the RH side of the axle.
----------------------------------------------------------------
Internals;
If you remove the left cone assy the whole internal comes out in one go and removal of circlip #5 will allow most of the gear parts to be accessed. It is however less easy to reassemble the #14 clutch if you work from the left side only. It isn't impossible or anything but it is much easier if you work from the right when reassembling.
If you instead remove the RH locknut, you can remove and inspect about 75% of the internals, all without disturbing the bearing adjustment (the right cone butts up against a shoulder on the axle, so the adjustment is the same when the hub is reassembled provided you the LH cone is undisturbed) and reassembly of #14 is a fair bit easier. The driver #17 rides on a shielded deep groove cartridge bearing on its left side and a cup and one bearing on its right side. As is usual for SRAM hub there is stuff-all factory grease inside and some corrosion is commonplace; the hub is not well sealed.
Unfortunately you can't inspect the #7 pawls by disassembling on the right side only, but you can just about see if they are working or not. This end of the hub seems to be a trap for all kinds of crud, so if there have been any problems inside the hub the debris might foul the #7 pawl engagement.
The gear works in the same way as many other three-speed gears but there are some subtle differences. The DD-II gear defaults to the low gear when the control rod is removed. The pawls on the planet cage (#7) transmit the drive to the hubshell in gear 1 and gear 2 (in contrast to an SA hub where they are used in gear 1 only).
If you want to see how the hub works, you can assemble the hub internals (less gear ring #8) and see the various parts moving and how the clutches are operated.
In gear 1 the pawls on the driver (#17) drive the gear ring (#8) and thence the planet cage (#7) and thence the hubhell via the #7 pawls. The #8 pawls and the #10 pawls are defeated by part #12 and the toggle key assy (shown as part of the axle in both images) respectively.
In gear 2 the #10 pawls are allowed to drive the planet cage (#7) and thence the hubshell using the same pawls as in gear 1. The drive is transferred from the driver to #10 via a dog clutch (#14) that is in permanent mesh in all gears. The #17 pawls are freewheeling because #8 is going faster than the driver.
In gear 3 the #10 pawls work as in gear 2 (driving the planet cage #7), but now the #8 pawls are allowed to drive the hubshell directly.
So why do these hubs sometimes break? Well basically they have four pawls on #7 that are meant to engage two at a time. However this assembly has been designed for small backlash and given this feature it is not made accurately enough for two-pawl engagement to be guaranteed.
This means that for some of the time only one pawl will be transmitting the drive, which is A Bad Thing. This will put a large side load onto the planet cage and this will then wear against the axle. Obviously the one pawl can break as well as the axle wearing etc. Once the axle is worn, the chances of the pawls engaging two at a time (as intended) are further reduced; the worse it gets, the worse it is going to get. There are multiple reports on the internet of failed #7 pawls and worn axles/planet cages and I can see exactly how this will happen.
To test if your hub is likely to do this, clean the grease from the #7 pawls and ratchet ring and reassemble the hub, being sure to eliminate any slack from the hub bearings. How turn the hub slowly (as per backpedalling or freewheeling in gear #1 or gear #2) and listen carefully. If you turn the hub slowly enough, you will hear each pair of pawls as a 'click-click' sound. Then the second set of pawls will make a similar 'click-click' sound, with a different spacing, then the first pair again, and so forth. If you assess what proportion of the time spent is between clicks, and how much is between pawl sets, you can get a good idea of how likely single-pawl engagement is; I would say that any more often than one time in twenty would be cause for concern, and that this is quite likely to be the case.
The cure is likely to be a different pawl spring arrangement, and/or trimming the pawl lengths/numbers so that they are more likely to engage simultaneously in pairs as intended. The OEM #7 pawl spring is a coil type, similar to the kind of spring that is used on hydraulic shaft seals etc. I think that it is soft enough to extend lengthwise easily and that this may allow the pawls to move in an unhelpful fashion even if they are the correct length; a conventional solid wire spring may be a better idea, especially if it only has one pair of pawls to control. If one pair of (diametrically opposed) pawls is simply removed, the backlash will double, but so will the chances of proper simultaneous pawl engagement, too. This might well make for a more reliable hub overall.
[BTW if the planet gears were designed to run with minimal radial clearance to the ring gear and the sun, this would better support the planet cage against side loads, and this would mitigate the effects of single pawl engagement. However the gears are dead sloppy, with barn door clearances, meaning that any side load on the planet cage is borne between the planet cage and the axle, with predictable consequences.]
So overall, not a bad effort from SRAM but the poor pawl engagement in gears 1 and 2 could be a serious problem that can lead to a premature demise. As to whether this is likely, it is a pot luck job depending on the build tolerances of the hub. If you do the tests outlined above, you can at least see if it is at all likely.
I note with interest that they have used the same design feature on some other SRAM hubs such as the i-9; further photos here;
http://www.rideyourbike.com/sramIGH.shtml
suggest it can be a weak spot in some of these other hubs too.
cheers