Help with Set-up Shimano BR-AT50 brakes….
Have these on a 1989 Dawes Galaxy.
My Procedure:
1. Tension straddle wire so that both top brake arms horizontal.
2. Left side brake post tightened up first and toed-in with cable ties. (although I am using Kool Stop Salmons, which say there is already toe in built in?)
Tab washer pointing upwards.
3. Tension straddle so LH side brake pad is touching rim. Or used with a combination of wire tension and a Irwin vice grip to hold the brakes.
4. Struggling to get enough purchase on RH side brake pad to tighten up the post - either end up over tightening (pad dives down on rim) or not tight enough (falls free when releasing wire/irwin vice grip.) - any tips on how to do this? I've also seen this done without any tension, the canti arm is released free and then pad post is tightened then checked for alignment.
5. Canti bosses regreased, springs checked for correct handedness -although both springs are the same colour, expected to see a gold and silver one, using middle hole spring setting. Bike was set with upper hole setting, presumably since it was bought, as the bosses needed a light sand, owing to rust.
6. To try and align pads equally I place a plastic party spoon handle on each side and tension until both pads hit.
7. LH side seems to not release from rim after letting go of brake lever, RH side noticeably further away. A little bit of play on RH side canti arm, even though properly engaged into boss.
Any improvements/critique to the way I am doing this? I think the RH spring has had it, but cant be sure. There is no adjustment screw for the springs on these cantis.
I've thought about upgrading to Paul brakes but have read the narrower boss clearances on a bike of this vintage may make this impossible. Also considering a pair of Shimano Altus's to harvest for springs or install.
Spent a weekend without success and cant let it defeat me!
BErtle
Help with Set-up Shimano BR-AT50 brakes….

Re: Help with Set-up Shimano BR-AT50 brakes….
I'm not sure I'm understanding step 4 correctly.
It's a fair time since I played with an actual AT-50 but I'm a regular with MT60, MT62, M732 which are slightly more upmarket versions.
My basic technique is to adjust for toe-in before attaching the straddle cable. Finger tight first with the tab pointing upwardish. Then using an allen key in the front of the post to hold things steady whilst tightening with a spanner at the back.
The At-50s lack tension adjustment springs and getting them anywhere near balanced was always a faff and a half. In extreme cases you may even end need the springs in different holes on each braze-on.
I highly recommend the stud fitting version of Koolstop cross pads (picture is threaded, choose unthreaded in the options). Fit these and once you've set the toe-in right you'll not have to mess around with it again.
Edit: Another plan bites the dust. Having finally worn them down, I needed to fit some replacements. In order to change the pads you need to unscrew the securing pin. You can't insert the allen key to do that without a risk of upsetting the toe-in settings .
.
It's a fair time since I played with an actual AT-50 but I'm a regular with MT60, MT62, M732 which are slightly more upmarket versions.
My basic technique is to adjust for toe-in before attaching the straddle cable. Finger tight first with the tab pointing upwardish. Then using an allen key in the front of the post to hold things steady whilst tightening with a spanner at the back.
The At-50s lack tension adjustment springs and getting them anywhere near balanced was always a faff and a half. In extreme cases you may even end need the springs in different holes on each braze-on.
I highly recommend the stud fitting version of Koolstop cross pads (picture is threaded, choose unthreaded in the options). Fit these and once you've set the toe-in right you'll not have to mess around with it again.
Edit: Another plan bites the dust. Having finally worn them down, I needed to fit some replacements. In order to change the pads you need to unscrew the securing pin. You can't insert the allen key to do that without a risk of upsetting the toe-in settings
Last edited by gaz on 6 Dec 2015, 6:58pm, edited 1 time in total.
High on a cocktail of flossy teacakes and marmalade
Re: Help with Set-up Shimano BR-AT50 brakes….
In addition to what Gaz has said i have allways found it helps to strip the brake, clean it and lightly grease the tabbed washer. Use the allen key to hold everything together and push it into the frame to ensure the brake pad is located correctly. You may need to adjust the tabbed washer to get the correct toe in. Then nip up the nut on the back of the caliper, check eveyrthing is correctly aligned then tighten the rear nut fully ensuring you do not move the allen key. 
It also helps to use a straddle wire yoke that has a cable clamp screw which helps to centre the brake arms and stops the cable slipping throgh the yoke.
3 hands help when doing all this
It also helps to use a straddle wire yoke that has a cable clamp screw which helps to centre the brake arms and stops the cable slipping throgh the yoke.
3 hands help when doing all this
Last edited by rjb on 2 Feb 2015, 10:35pm, edited 1 time in total.
At the last count:- Peugeot 531 pro, Dawes Discovery Tandem, Dawes Kingpin X3, Raleigh 20 stowaway X2, 1965 Moulton deluxe, Falcon K2 MTB dropped bar tourer, Rudge Bi frame folder, Longstaff trike conversion on a Giant XTC 840 

Re: Help with Set-up Shimano BR-AT50 brakes….
Your 1...set the pads on as short a post as possible, so the arms are as high as possible.
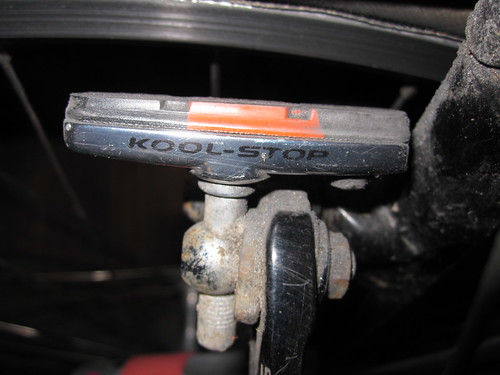
The sticky-out bit at the back of KoolStop shows how much toe-in to give. I find no reason to re-set toe-in as the pad wears....YMMV
2....The washer with the tab is a wedge washer....rotating the tab sets the toe in.....zip-ties are not needed. As I recall, the thickest bit of the wedge washer is at the tab.
3 ....I just use the cable.
4...as Gaz says, Allen key to hold the post, spanner on the nut.
5...Strip the rear brake and see if it has 2 springs the same or a pair?
6...Pardon?
7...Springs should be a pair, not 2 the same.
There is a thread running about narrow canti bosses
Bike fitting D.I.Y. .....http://wheel-easy.org.uk/wp-content/uploads/bike-set-up-2017a.pdf
Tracks in the Dales etc...http://www.flickr.com/photos/52358536@N06/collections/
Tracks in the Dales etc...http://www.flickr.com/photos/52358536@N06/collections/
Re: Help with Set-up Shimano BR-AT50 brakes….
The BR-AT50 is actually not a difficult brake to work on. I barely recognise it from the OP's faff-fest description!
Re the springs; are you sure they are in the right way round? I.e. not swapped left for right, or mixed up front and rear? [As the brake comes on, the coil should 'tighten/constrict' around the post. The left and right springs are a mirror image of one another.] There is a simple trick to adjusting them.
Re the posts; if you are 'sanding rust off them' then they are clearly in a disgraceful state. You need to remove all the rust, and to assemble the brake without the springs in, and make sure that each arm rotates freely round the boss without any binding. If the posts are bad or there is a problem with the front washers (which can get deformed if the bolt is overtightened, BR-AT50 front washers are only soft aluminium) then the arm will bind. No binding is the way ahead here. Any binding at all is bad! Fix the binding before fiddling with the springs in any way!
Re wear between the posts and the brake arms. If there is much then the brake may be noisy or even dangerous. If you replace brakes fitted to worn/rusty bosses then think about buying brakes like Avid shortys, which have an integral pivot built into them. These will work perfectly even when fitted to quite worn bosses. Shimano (and others) make brakes like this too.
If you use BR-AT50s where there is slight wear on the pivots then it often helps enormously if you wind a few turns of PTFE tape round the boss before refitting the brakes. Too much and it will bind again but just the right amount will let the brakes work well and the slop in the mechanism will be less of a problem.
To set the springs; first be absolutely sure that both arms can rotate freely without any binding. Set the springs both in the same hole on the boss. Start with the middle hole. Now, if the springs are set unequally, the arms will sit at different angles when the straddle is off and there are no brake blocks installed. If they are different angles, it is OK to overextend one arm so that the spring takes a new 'set'. This takes about five seconds to do; I've seen many mechanics do this with these brakes and I've also seen them do it even when there are adjustment screws available; this way is quicker!
Then check with the straddle hooked up. Remember that the arms don't have to be exactly perfectly at the same angle because you can always make a fine adjustment on the brake pad post mounts.
Now mount the pads at the correct angle. As others have said you need to hold the front of the pad bolt using an allen key when tightening the bolt fully. But for initial adjustments you can simply hold the brake block with your fingers as you nip up the thin nut at the back. Test the adjustment by pulling on the brake lever, but don't pull the brake on hard when you are checking the adjustment with the nut nipped up; just bring the brake block close to the rim. The final adjustment is often the toe, using the wedge washer.
Now, a lot of people moan about having to adjust the wedge washer. Obviously this won't turn if it is nipped up too tight or it is covered in crud or anything. The brakes are actually supplied with thin wave washers at the back, next to the thin nut; the idea is that the nut can be backed off 1/4 turn and the pad will still sit there without moving, held by the tension of the wave washer. If you move the pad to a new position or adjust the wedge washer (or the vertical height, there is a slot with about 5mm vertical adjustment in there where you can't see it) then it will simply sit in the new place instead, provided your wave washer is OK.
Now, if your wave washer is missing or broken, or you back the nut off too far then this won't work at all. So if your wave washer is no good, you might want to replace it. IIRC it is usually OK to use a spring washer instead here, provided it is of good quality and not too thick.
I've used this type of brake for about 30 years now on several bikes and they are very easy to look after if you know what you are doing. By contrast I've had brakes with alignment screws and they have been nothing but trouble; the screws have broken the springs, adjusted erratically, dropped out or seized up. I can't say I mind not having them on BR-AT50 brakes, not in the slightest.
hth
cheers
Last edited by Brucey on 3 Feb 2015, 12:00am, edited 1 time in total.
-------------------------------------------------------------------------------
~~~~~~~~~~~~~~~~~~~~~~Brucey~~~~~~~~~~~~~~~~~~~~~~~~
~~~~~~~~~~~~~~~~~~~~~~Brucey~~~~~~~~~~~~~~~~~~~~~~~~
Re: Help with Set-up Shimano BR-AT50 brakes….
Thanks for all of the useful tips so far from a few of the Masters. I'm a little relieved to hear that balancing them is not easy (Gaz)....well, at least not for a novice like me. These are the first cantilever brakes I have adjusted. Seems like somebody before me has replaced two like springs (both silver ones in my case, but the 'handedness' of each one seemed ok, from pictures I've seen) and this is causing problems. I've got some Shimano Altus brakes on the way to harvest for spares, springs, tab washers etc. Thanks rjb, I have one of those cable yokes with the cable screws, a cheap clarks one. (Anyone know where to find a swish pair of Avid Tri Dangles from UK source?)
I never knew that the tabbed/wedge washer (colin531 - good pics thanks) is used to set the toe-in, will be re-greasing this too (rjb) I just thought they needed to point upwards in line with rear frame stays. I am not entirely sure how to use them to set the toe in -sorry if its simple- with brake pad against the rim, rotating the tab washer until a good toe-in is achieved? I am using Kool Stop Canti salmons as replacement pads - once the rear toe in adjustment thingy is just touching the rim, the toe in is just right?
thanks again,
BErtle.
Re: Help with Set-up Shimano BR-AT50 brakes….
Yes, just rotate the washer tab until the front and back of the pad hit the rim simultaneously, the extra bit on the heel of the KoolStop gives the right toe in like this. The thickest bit of the wedge washer is on the side of the tab, use the thick bit to wedge the brake pad stud at the appropriate angle to the brake arm.
Re. Brucey's tip about using brakes with their own pivot bushing if your canti. studs are worn......They have changed the front canti. studs.........modern canti. studs are 80mm apart, more or less......if your front canti. studs are much less than this, modern cantis. won't work
Re. Brucey's tip about using brakes with their own pivot bushing if your canti. studs are worn......They have changed the front canti. studs.........modern canti. studs are 80mm apart, more or less......if your front canti. studs are much less than this, modern cantis. won't work
Bike fitting D.I.Y. .....http://wheel-easy.org.uk/wp-content/uploads/bike-set-up-2017a.pdf
Tracks in the Dales etc...http://www.flickr.com/photos/52358536@N06/collections/
Tracks in the Dales etc...http://www.flickr.com/photos/52358536@N06/collections/
Re: Help with Set-up Shimano BR-AT50 brakes….
good point about the narrow bosses; of current designs, shimano CX-50 and CX-70 cantis have integral pivots and can be made to fit bosses of different widths, so I'd look to use those on badly worn, narrow bosses. Shimano have also made other 'integral pivot' canti models in the past, and some of these will also work (with a few mods) on narrow spaced bosses too.
cheers
cheers
-------------------------------------------------------------------------------
~~~~~~~~~~~~~~~~~~~~~~Brucey~~~~~~~~~~~~~~~~~~~~~~~~
~~~~~~~~~~~~~~~~~~~~~~Brucey~~~~~~~~~~~~~~~~~~~~~~~~
Re: Help with Set-up Shimano BR-AT50 brakes….
Thanks for providing a number of golden insights into the workings of these brakes, Brucey. From reading your extensive post, I probably have several problems: worn/mismatched springs, worn out wave washers/wedge washers. Colin531, thanks for explaining the how the wedge washers work with the heeled KoolStop pads!
Will use PFTE on bosses before refitting, RH side did not hang as freely as the LH side with springs installed - without the pads or wires. Was a bit of surface rust present, and what looks like some scratches from the brake pivots, possibly as a result of the bosses not being re-greased for a very long time, perhaps even since 1989 when the bike was new.
The 'integral pivot' CX50/70 canti brakes could be the way forward if I cannot eliminate/solve the other problems one by one. I've bought some shimano altus brakes so I can harvest the various washers and springs to use with the original BR-AT50 brakes. I'd like to keep the originals going where possible as I've read they are very decent when set up correctly. Even replacing the original rack with a Tubus Cosmo has been tough as the frame geometry is much smaller, lots of spacers needed.
I bought a work stand today too, because adjusting these brakes and also trying to balance the bike against kitchen cupboards when tightening up things was a nightmare!!
Thanks for the brilliant advice, much more confident to get this old steed back on the road.BErtle.
Re: Help with Set-up Shimano BR-AT50 brakes….
Go for it!
Bike fitting D.I.Y. .....http://wheel-easy.org.uk/wp-content/uploads/bike-set-up-2017a.pdf
Tracks in the Dales etc...http://www.flickr.com/photos/52358536@N06/collections/
Tracks in the Dales etc...http://www.flickr.com/photos/52358536@N06/collections/
Re: Help with Set-up Shimano BR-AT50 brakes….
Here is a photo of my spare set of BR-AT50s (date code MA = 1988:Jan);
I've laid the springs next to one another and the arms out as if you are looking at the rear of a front brake. Hopefully you can see how the springs are meant to look (apart from a little rust). You can see the slot in the caliper arm, which allows a few mm of vertical movement. This adjustment means that with these brakes you can fit either 27" wheels (-630) and 700C wheels ( -622) in the same frame, if you get the bosses in the exact right place.
The wave washer (just to the left of the 10mm nut in the photo) is very thin and often corrodes, cracks or disappears. Even when it is in good condition it loses its grip if you back the nut off more than 1/3rd of a turn. IIRC Altus brakes don't have the wave washer fitted so you'll have to seek that one elsewhere, even if some of the other parts are useful to you.
A flaw with these brakes is that the plating on the fasteners just isn't up to the British weather; I'd recommend that a little waxoyl used in the right places can prevent the worst of the corrosion.
Note that shimano brakes from this period have the pinch bolt on the caliper arm (not shown in my photo) such that the nut bears against a sleeve, and the pinch bolt and sleeve together are free to articulate in the end of the arm slightly even when the pinch bolt is tightened. This means that the straddle cable shouldn't be so liable to fatigue near the pinch bolt, as it can be with many other brake designs.
If the BR-AT50 is fitted to 65mm bosses it may only be configured as a wide profile canti. If it is fitted to 80mm bosses it can instead be configured as a mid-profile canti, which is potentially a fair bit more powerful. I've used them both ways on various bikes.
For incorrigible fiddlers; you can also reverse all the mounting hardware so that the nut is at the front on the front brake, and the pad post is behind the arm. IIRC you need to invert the domed aluminium piece when it is fitted the other side of the arm.
Why might you want to do this? Well, this allows the net thrust vector from the front brake pads to pass through the brake pivot rather than in front of it. This gives the brake an easier time of it and may affect (improve) the power, tendency to squeal etc. However with any kind of long pads fitted, they will foul on the forks of course.
hth
cheers
- Shimano BR-AT50 laid bare
I've laid the springs next to one another and the arms out as if you are looking at the rear of a front brake. Hopefully you can see how the springs are meant to look (apart from a little rust). You can see the slot in the caliper arm, which allows a few mm of vertical movement. This adjustment means that with these brakes you can fit either 27" wheels (-630) and 700C wheels ( -622) in the same frame, if you get the bosses in the exact right place.
The wave washer (just to the left of the 10mm nut in the photo) is very thin and often corrodes, cracks or disappears. Even when it is in good condition it loses its grip if you back the nut off more than 1/3rd of a turn. IIRC Altus brakes don't have the wave washer fitted so you'll have to seek that one elsewhere, even if some of the other parts are useful to you.
A flaw with these brakes is that the plating on the fasteners just isn't up to the British weather; I'd recommend that a little waxoyl used in the right places can prevent the worst of the corrosion.
Note that shimano brakes from this period have the pinch bolt on the caliper arm (not shown in my photo) such that the nut bears against a sleeve, and the pinch bolt and sleeve together are free to articulate in the end of the arm slightly even when the pinch bolt is tightened. This means that the straddle cable shouldn't be so liable to fatigue near the pinch bolt, as it can be with many other brake designs.
If the BR-AT50 is fitted to 65mm bosses it may only be configured as a wide profile canti. If it is fitted to 80mm bosses it can instead be configured as a mid-profile canti, which is potentially a fair bit more powerful. I've used them both ways on various bikes.
For incorrigible fiddlers; you can also reverse all the mounting hardware so that the nut is at the front on the front brake, and the pad post is behind the arm. IIRC you need to invert the domed aluminium piece when it is fitted the other side of the arm.
Why might you want to do this? Well, this allows the net thrust vector from the front brake pads to pass through the brake pivot rather than in front of it. This gives the brake an easier time of it and may affect (improve) the power, tendency to squeal etc. However with any kind of long pads fitted, they will foul on the forks of course.
hth
cheers
-------------------------------------------------------------------------------
~~~~~~~~~~~~~~~~~~~~~~Brucey~~~~~~~~~~~~~~~~~~~~~~~~
~~~~~~~~~~~~~~~~~~~~~~Brucey~~~~~~~~~~~~~~~~~~~~~~~~
Re: Help with Set-up Shimano BR-AT50 brakes….
Brucey, These are indeed the brakes on my Dawes Galaxy. I appear to have two silver return springs, possibly one is arranged back to front to get the 'handedness' of the spring correct. Will use Altus brakes to harvest for springs + new canti boss bolts. You have made an interesting point about 65mm bosses and the BR-AT50 brakes being wide profile - would altus brakes on these 65mm narrower bosses have any more stopping power/advantages with kool stop salmon pads?
Bertle
Bertle
Re: Help with Set-up Shimano BR-AT50 brakes….
the Altus brakes might well be more powerful; on 65mm bosses you may only be able to set them up as a mid-profile brake though (very powerful with a low straddle), and you may need to use lower profile brake shoes as well; it is a suck it and see job, that.
With the BR-AT50 springs they are left and right handed, but turning each one upside down doesn't change anything. You can't alter or 'correct the handedness of the springs' by installing them differently. Are you sure you don't also have a bad pair of springs in the rear brake?
Whatever you do, just make sure that you have a matched mirror image pair of springs and that you install them on the correct side.
The left side front spring has a right handed coil to it and the right side front spring has a left-handed coil to it.
If in doubt refer to the photo I posted.
cheers
-------------------------------------------------------------------------------
~~~~~~~~~~~~~~~~~~~~~~Brucey~~~~~~~~~~~~~~~~~~~~~~~~
~~~~~~~~~~~~~~~~~~~~~~Brucey~~~~~~~~~~~~~~~~~~~~~~~~
Re: Help with Set-up Shimano BR-AT50 brakes….
Thanks Brucey! Will replace with Altus rear springs and be mindful to install them on correct sides. After setting up original brakes, if problems persist or if I want to experiment, will install the Altus brakes.
Thanks for your extensive posts on these brakes and how to get them running - have confidence now this weekend will be better than the last! Bertle.
Thanks for your extensive posts on these brakes and how to get them running - have confidence now this weekend will be better than the last! Bertle.
-
hoogerbooger
- Posts: 676
- Joined: 14 Jun 2009, 11:27am
- Location: In Wales
Re: Help with Set-up Shimano BR-AT50 brakes….
I have these brakes on my Raleigh Randonneur. I am trying to work out the best yoke height cable angles, having essentially kept them until now at the angles they were when I bought it 2nd hand last century. Just found the shimano set up instruction:
My front brake was set up like the above with a high straddle and substantially less than 90 degrees between the two wires below the yoke. However because the Blackburn rack attaches only to the inside of the stays the yoke was set low to avoid the wires fouling the rack, with resulting angle a little greater than 90 degrees. So one of the brakes presumably has greater mechanical advantage......If the shimano instruction is right it'd be the front.
So are the Shimano instruction right for the strongest braking ?........
(Incidentally rear bosses 70mm spacing, whilst front at 65mm)
Additionally there is some play so the bosses/brake bushes presumably have some wear. I note Brucie suggests PTFE tape. If I do this do I not grease then ? Just rely on the tape? taping over clean degreased surfaces.
Last edited by hoogerbooger on 27 Jun 2020, 7:20pm, edited 1 time in total.
old fangled