...pedals live hard, dissolute lives, in an oft-forgotten and neglected part of the bicycle, where they see the least maintenance and the worst conditions, being showered liberally in the muck that comes off the front wheel....
-or words to that effect. It is probably as true now as it was then, fifty odd years ago. The difference is perhaps that today, half decent pedals can be bought very cheaply; so cheaply in fact that folk tend to neglect them and then chuck them away when they go wrong, rather than to maintain them and/or repair them. This is a shame because many inexpensive pedals are actually far better made than budget pedals used to be. Years ago, cheap pedals (eg 'Union' ones) had non-adjustable ball bearings (which were often slack from day one), and spindles that quite often bent or just broke. They really were not very good. If you were lucky enough to have a set of adjustable pedals, chances are that they had pressed steel bodies, assembled by riveting (that often worked loose) and/or a feeble tab washer inside the pedal, that fitted a single tab into a narrow, stress raising groove in the pedal spindle. Often the tab on the tab washer didn't survive the first adjustment without failing.
By contrast today's cheap pedals usually have very strong CrMo spindles (when was the last time you saw one break?) and the tab washer is usually built like the ones in the very excellent MKS pedals, even if the pedals in question are cheaper than that. The pedal spindles have a smaller stress-raiser in them, and the tab washer works better too.
IMHO the best kind of budget pedals to buy are ones with adjustable cup and cone bearings; be wary of those which say 'sealed bearings' and/or 'cartridge bearings' especially if the pedal bodies are appealingly slim; both statements may be true but the bulk of the load may be borne by a thing called 'a DU bushing' which is cheap, nasty, high in friction, and potentially rather short lived. So what to look for when buying inexpensive pedals with cup and cone bearings?
There are pedals with a plastic body; these are best avoided. You don't have to spend much to get ones with a cast aluminium body; into this the cups are set. Avoid the ones that are cheaply made and have very slim bodies; if they do have cup and cone bearings they may be rather undersized ones. it is possible to make good pedal bearings with tiny parts in them (eg Shimano SPDs etc) but these are an exception. Typically in 'normal' pedals the spindles use 1/8" or 5/32" ball bearings and the cups are usually about 20mm OD or 22mm OD depending on the ball size used. the cups are the same OD at each end of the pedal but have a different bore size, so that balls cannot escape through the centre hole, given that the spindle is tapered. 5/32" balls make for a stronger (and lower friction) bearing than 1/8" ones, but if kept adjusted and lubricated properly, either can give a smooth and reliable bearing.
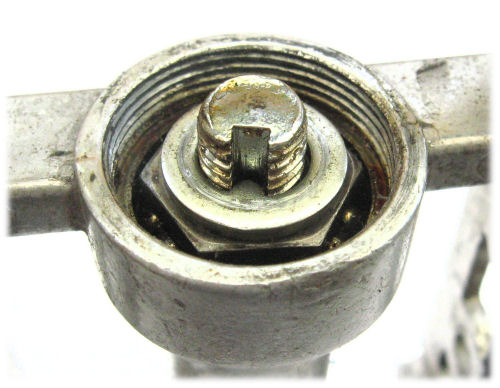
Dustcaps are either pressed into a recess (and need to be pried out) or are screwed into position. Plastic dustcaps which are smooth on the outside are almost invariably pressed into place. Removal of the dustcap usually presents this kind of view;

Which comprises a locknut (11, 12 or 13mm usually, for which you will need a full-hex socket, ideally) behind which there is a tab washer and a cone which has the bearing surface on it, and behind that you can see the balls (12 of them in this case). The tab washer bears against two flats on the spindle and it prevents the cone from turning wholesale as the locknut is loosened/tightened. It should be noted that the tab washer always has some backlash on the spindle; this can make cone adjustments a little hit and miss, until you learn to keep track of whether the tab washer has or has not moved with the cone. The cone is best adjusted by teasing it round using a small screwdriver.
Obviously the locknut pushes the cone down onto the thread flanks, so the correct adjustment is obtained by tightening the cone finger tight, and then backing it off about 1/6th of a turn (to allow for the clearance in the threads). Trial and error from there will get it spot on; the objective is (with the locknut tight) to have no free play and no roughness or binding.
This photo shows the alternative (older type) design ( locknut removed)
with a single tab on the tab washer. This design commonly has less backlash but isn't as strong.
With cheap pedals it isn't a bad idea to check that the correct number of balls is actually installed; quite commonly there is one ball missing in one or more of the four pedal bearings. Each bearing takes approximately 11, 12, or 13 balls, depending on the design. If in doubt, add an extra ball, tighten the cone finger tight and see if the bearing feels nice or bindy. If bindy, and there is no longer any gap visible between the balls, maybe it was one too many.
Obviously the inboard bearing is susceptible to getting water in it. It is also easy enough to lubricate, if there are no seals; the lazy way of keeping on top of this is to simply spray the bearing with an aerosol SFG (or motorcycle chain lube) through the gap. If this is done once every couple of weeks most unsealed pedals will survive the winter OK. Oil works too but it doesn't persist in the same way, so repeat applications are required more often. The outboard bearing is protected by the dustcap but this doesn't entirely prevent corrosion; repacking the bearing with grease every year or two isn't a bad idea. Better yet fit a lube port to the pedal.
Clearly one important factor is the design of the pedal; will your foot slip on it, or be comfortable in the shoes you intend to wear? Might you want to fit toe clips? Are you going to keep the (legally required) reflectors? Are the reflectors liable to be knocked off or are they positioned in a recess in the pedal body?
Another important factor is how the pedal body is put together. There are commonly several different options
1) cast one-piece body
2) cast centre body with wrought cage plates, riveted in position
3) cast centre body with wrought cage plates, screwed in position.
The first of these is OK provided the body is designed to be made that way, i.e. so that there are not too many delicate protrusions that can get knocked off; cast aluminium is usually a lot less ductile than wrought stuff.
The second of these is OK provided the rivets are good and strong. Good rivets are seen on pedals like the MKS sylvan models, and making pedals this way is impossible with poor quality (brittle) cast bodies.
If screws are used to hold the pedal together then the screws need to be strong, well fitting, and properly tight and/or threadlocked. Screws vary from 'thread forming' type to nicely machined screws that fit well into tapped holes and are usually in either M4 or M5 size.
The photo below shows how this can all go horribly wrong;
- a dodgy bunch of pedals
Clockwise from top left they are VP-516A, one-piece Wellgo LU-962, and an unknown pedal with no markings. The last of these had problems from the start with the cage screws backing out, but at least the cage was ductile. The LU-962 RH pedal has had all four cage projections broken off its cast body and then the dustcap was lost; the left pedal somehow survived unscathed. Both these pedals sets had bearings that had never been adjusted or lubricated, and were variously bone dry and/or very loose, but would come good again with a little TLC . The VP pedals have wrought cages held on with (unthreadlocked) screws and may well have suffered the same fate as the no-name pedals in time; however the bearings were set so tightly from new that the pedals were removed from a new bike and unceremoniously hoyed into the LBS scrap bin before they had even done a turn.
Note that the VP pedals don't have a full shoulder on the pedal spindle; this allows more room for a decent sized spanner but it also allows chews the crank up (if a pedal washer is not used) and allows water to penetrate the pedal thread more readily. Such pedals can seize into the crank more easily and there is no such thing as 'too much' anti-seize in the pedal threads; best if you coat both the crank thread and the pedal thread before the parts are assembled; this prevents the anti-seize being wiped off the pedal thread on the way in, leaving none on the backside of the thread.
The above all applies to good/medium quality pedals such as MKS ones, as well as cheaper ones (like Wellgo or VP) that come from Taiwan or China. Even the latter can last well; I had a set of cheap VP ones that I eventually retired (after at least 30000 miles); despite a 'corrosion incident' early in their life they were amongst the smoothest pedals I have ever used by the time they came off the bike, and they hadn't needed any further adjustment for several years, just an occasional squirt of lube through the lube port.
Now it may seem a waste of time, servicing a £10 pair of pedals, but IME this can make them work as well and as reliably as a much more expensive set. In this day and age any re-use and life extension of anything is one tiny act that spares the planet, just a little bit, too.


